
Every Tuesday, we post specific items you should gather in order to supplement your emergency car kit, your 3-month supply, and your longer-term storage. If you are new to our blog, don't worry! You won't be left behind. Just start up where we are and follow along. You will eventually have everything completed! Once the car kit is complete, we'll be putting together 72-hour kits again (week by week). Once those are done, we'll gather the car kits again. So don't worry, just jump on in and join us where we are today!
This week for your car kits, add some hand sanitizer. Last time we gathered this, a lot of people mentioned that they had tried to do this in the past, but it tends to "explode" or leak if it's stored in the car. Thankfully, some people suggested dumping a little bit out first, so that it's not so full when you store it. Hopefully that will work for you!
How is your three-month supply coming along? It's not as hard as you think: just make a menu plan for 3 months of food (7, 14 or 21 different food storage recipes, for example), then make a master shopping list. It's your food storage plan! Don't have time to plan your food storage? Check out our food storage e-book - we've done it all for you.
April's almost over, but we're still gathering wheat for our longer-term storage. I like keeping my longer-term storage in #10 cans. Abbie has a lot of 5 gallon buckets and gamma lids for hers. Decide what's best for you and start stocking up!
Tuesday, April 27, 2010
Monday, April 26, 2010
Inspirational Thought
 The true nature of people becomes obvious in times of real need. Good people become better; they get close to one another; they learn to share and become united. The strength that develops out of unity of the many good people becomes a real survival factor. On the other hand, people who lack emotional stability become cruel and ruthless under trying circumstances; however, they do not seem to become an overbearing threat because of the closeness and unity of the majority of the people. Therefore, strangely enough, those who have survived hardships look back with fond memories to the awful period of pain and destruction because they recall the closeness that developed as they united themselves to survive by sharing whatever they had.
How blessed we are to be taught in these times of plenty that we might prepare for times of need without undue haste. Even more wonderful is the realization that we can prepare ourselves without fear because we know that God lives, that He knows and loves each one of us, and that He is giving us direction in these latter days through a living prophet.
God loves us so much that He allows us to come to Him at any time with our personal requests for help and direction—that our eyes will be opened and we will learn to live with wisdom and patience in times of austerity, that we might learn by the Lord’s influence to identify our real needs.
What a comfort it is to read His revelation to the Prophet Joseph Smith, “If ye are prepared, ye shall not fear.” (D&C 38:30.)
The Lord wants us to be prepared.
Ensign 1982 June
How Beautiful to Live in These Times and Be Prepared!
By Elder F. Enzio Busche
Of the First Quorum of the Seventy
Friday, April 23, 2010
Food Storage Friday: Black Bean and Corn Salad

I'm so excited about this recipe. Not just because it's delicious, but because I'm using my first garden produce of the year!
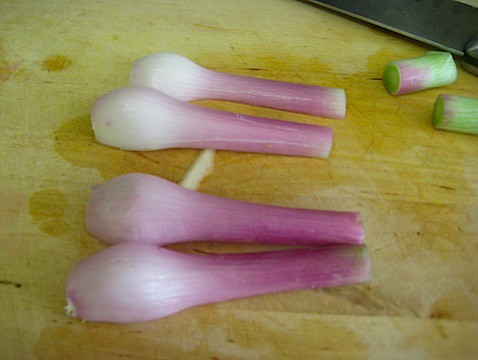
Last fall we planted cabbage, broccoli and red onions. It's just been the last couple of weeks that we've picked the produce and eaten it. This recipe features my homegrown red onions. Food grown in your garden is totally food storage because you aren't depending on anyone else to get it.

Ingredients: red onions, olive oil, corn, diced tomatoes, lemon juice, red wine vinegar and black beans.
I cooked these beans from dry and then just measured out two cans (1 2/3 cups each can) worth. You can use canned beans just fine.

If you have tomatoes from your garden, you can use those, but since my tomatoes aren't nearly ready yet, I just used diced. I drained them so they wouldn't be too wet.
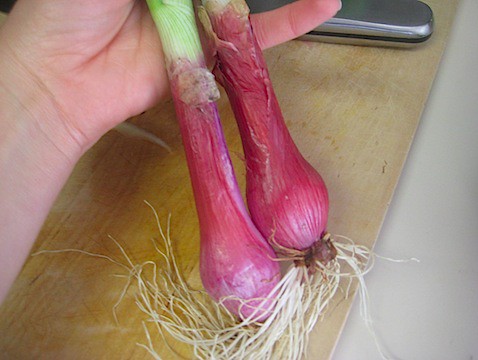
Homegrown red onions!
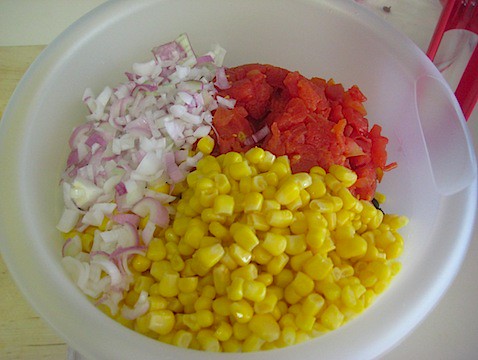
Chop up the onion and combine the onion, corn, tomatoes and black beans in a bowl.

Add the lemon juice
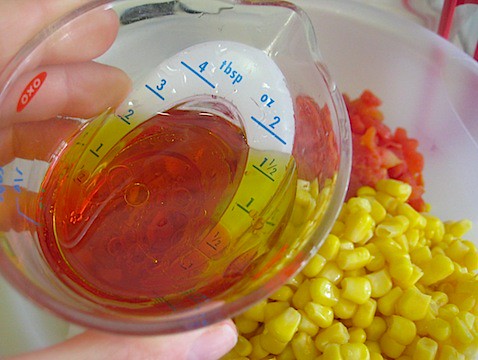
oil and red wine vinegar

salt
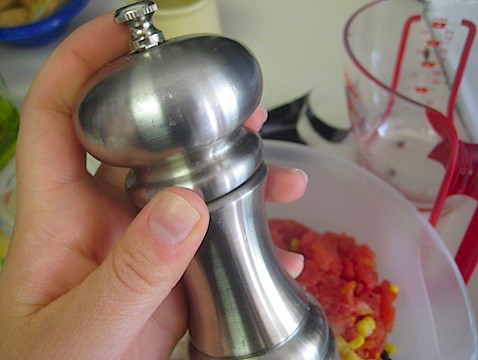
pepper
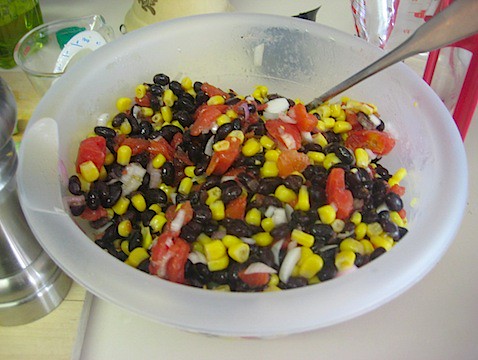
Mix it all together. If you have cilantro growing in your garden, chop some up and mix it in. I'm not a big fan of cilantro--so I left it out. If you don't like cilantro either, check out this article: Cilantro Haters It's Not Your Fault.
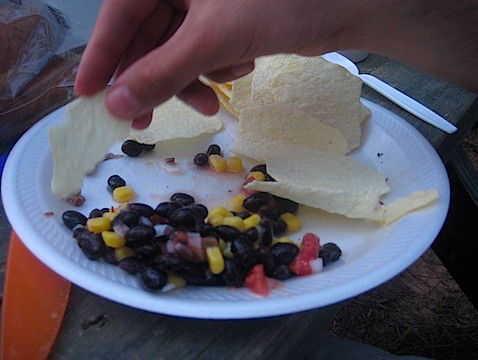
Pack it up and take it camping, or to a BBQ--it's a delicious summer salad.
Black Bean and Corn Salad
What We Eat
1 15oz cans black beans, rinsed and drained
1 17oz can whole kernal corn, drained
1 15oz can diced tomatoes, drained
1 purple onion, chopped
1/4 cup chopped cilantro (optional)
3-4 Tbsp lime or lemon juice
2 Tbsp olive oil
1 Tbsp red wine vinegar
1 tsp salt
1 tsp pepper
Combine ingredients in a large bowl, cover and chill. Garnish with fresh cilantro.
Thursday, April 22, 2010
Goal Check Up
I've gotten into a food storage rut lately. I'm sure you've all been there. It's kind of a "look the other way" mentality for me. If I pretend I don't have food storage, I won't worry about it. But when Mountain Man was making rice the other day he noticed things moving in it...yep, bugs in our food again! The first time was oats, and now rice. Eek. There's nothing like crawly things in your food to spur you to action.
I've decided that I'm obviously not rotating my food fast enough. So each time I bring home some grains, I'm going to stick the package in my deep freeze for 3 days to kill any bug larvae. I have two packages of rolled oats in there now.
While I was bleaching out my rice bucket I decided I'd better jump back in and get on top of things.
1. Switch out 72 hour kits to include protein shakes and shaker cups.
I haven't even looked at my 72 hour kits! We were out of town over Conference so I didn't check them then. I need to price shaker cups and then go through my kits.
2. Build water storage by buying a case of bottled water per quarter and adding 2-2L soda bottles of water each month.
I did buy a case of bottled water, but we drank it on our vacation (coastal water is nasty--no offense to any coast dwellers), so I need to buy another one. I have been doing pretty good at filling my soda bottles with water. I've probably done 4-5 so I need to kick it up a notch.
3. Restock my 3-Month Supply
I've been buying pasta sauce and noodles as they go on sale, but I could really use an updated master list. I'm getting new carpet and will have to clean out my food storage closet and under my beds, so that will be a good time to take an update inventory.
As you can see I have a ways to go, but at least I'm getting re-energized about it, and it's only April!
How are you doing on your food storage goals so far?
Wednesday, April 21, 2010
How To: Grow Starts from Seeds
It's that time again. You know, the time when you feel guilty for not really wanting to start gardening while at the same time, feeling guilty for having to spend so much money on said garden.
Well, I can only help you with one of those guilts--the one where spending money is involved. This year, try growing your tomatoes, peppers, onions and other plants from seed.
The average store bought start costs about $2. While, the average packet of seeds only costs about $1.50 and grows as many tomatoes, or whatever else you want, as you can use.
All you need is the seeds you want, good dirt, and something to plant them in--be it pots or a store bought starter tray.
 This was our seed set up last year.
 This year we upgraded a bit. We found these trays at Walmart for $5 dollars each, the dirt for all of them (plus some extra) totalled about $10 and the seeds were another $10.
$35 for a full garden of starts is a really good deal--especially considering we are furnishing both our parents garden starts as well.
 If you have a neighbor or friend whose interested in gardening, ask them if they want to grow onion starts and you will furnish the tomatoes. My mom's working on a white tomato for me which I am very curious about.
 If you get more than one sprout in one square, gently pull it out and transplant it to an empty area.
 Try some flower starts.
 Or maybe some herbs.

 If you have a neighbor or friend whose interested in gardening, ask them if they want to grow onion starts and you will furnish the tomatoes. My mom's working on a white tomato for me which I am very curious about.
After you have chosen your seeds and filled your planters with dirt, make sure you wet the soil before planting.
As you are planting make sure you mark your seeds they are all going to look very similar when it's time to plant.
After your seeds are planted, marked, and watered, follow the directions on the seed packets, watering regularly.
Make sure after they have sprouted, to store them in a well lit area.
 If you get more than one sprout in one square, gently pull it out and transplant it to an empty area.
 Try some flower starts.
 Or maybe some herbs.
My husband informs me, you can plant outside when the start has a second level of leaves, we still need to wait for ours to sprout more leaves. Once your starts are ready, make sure the weather is appropriate to plant--you can check your local weather or even asking your gardening, genius neighbor.
Don't worry if they look sad and dismal at first, ours did. They looked so small and fragile we actually went out and bought some starts from a greenhouse. But once our home grown plants got going, they far out produced the store bought ones.
Like I said, I am a novice gardener, so if you have any advice or suggestions to add, please do.
Happy Planting!
Tuesday, April 20, 2010
Food Storage Tuesday
Every Tuesday, we post specific items you should gather in order to supplement your emergency car kit, your 3-month supply, and your longer-term storage. If you are new to our blog, don't worry! You won't be left behind. Just start up where we are and follow along. You will eventually have everything completed! Once the car kit is complete, we'll be putting together 72-hour kits again (week by week). Once those are done, we'll gather the car kits again. So don't worry, just jump on in and join us where we are today!
This week for your car kits, add jumper cables. You can find them in many stores: WalMart, Target, etc., or in any auto shops. You can also find them online , so shop around. The one I've linked to on Amazon come in a great little pouch and even have extension cords. Find what works best for you and add it to your car kit.
How is your three-month supply coming along? I told you a few weeks ago that I'm actually eating through my food storage right now, and setting aside the saved grocery money so that I can stock back up after we move. Want to know what I'm eating? Check out our food storage recipes page and you'll get a good idea. I'm also using a lot of the canned items to supplement other meals with fresh fruits and veggies. (I love spring/summer for all the wonderful food it brings!).
Also, FYI for all you Utahns, many grocery stores are having case lot sales right now (Macey's in Provo, for one). I am in Utah right now visiting my sister, and I am SO jealous of all the great opportunities she has to buy cases for food for a great deal! Be sure to check those out if you live in Utah valley! (Even if you don't, it may be worth the drive if you live relatively close!). Too bad there's a fifty pound limit on my baggage going home, or else I'd stock up too.
This month for our longer-term storage we are gathering wheat. You can buy wheat that's already canned up in #10 cans on several websites: LDS Catalog and Emergency Essentials are just a few. EE also has wheat in 5 gallon buckets, which is great. And don't forget to check out Our Happy Homestead for wheat grinders and other great tools.
Not sure what to do with wheat? Check out our articles all about wheat, how to store wheat and food storage recipes using wheat.
This week for your car kits, add jumper cables. You can find them in many stores: WalMart, Target, etc., or in any auto shops. You can also find them online
How is your three-month supply coming along? I told you a few weeks ago that I'm actually eating through my food storage right now, and setting aside the saved grocery money so that I can stock back up after we move. Want to know what I'm eating? Check out our food storage recipes page and you'll get a good idea. I'm also using a lot of the canned items to supplement other meals with fresh fruits and veggies. (I love spring/summer for all the wonderful food it brings!).
Also, FYI for all you Utahns, many grocery stores are having case lot sales right now (Macey's in Provo, for one). I am in Utah right now visiting my sister, and I am SO jealous of all the great opportunities she has to buy cases for food for a great deal! Be sure to check those out if you live in Utah valley! (Even if you don't, it may be worth the drive if you live relatively close!). Too bad there's a fifty pound limit on my baggage going home, or else I'd stock up too.
This month for our longer-term storage we are gathering wheat. You can buy wheat that's already canned up in #10 cans on several websites: LDS Catalog and Emergency Essentials are just a few. EE also has wheat in 5 gallon buckets, which is great. And don't forget to check out Our Happy Homestead for wheat grinders and other great tools.
Not sure what to do with wheat? Check out our articles all about wheat, how to store wheat and food storage recipes using wheat.
Monday, April 19, 2010
Inspirational Thought

"The best food storage is not in welfare grain elevators but in sealed cans and bottles in the homes of our people. What a gratifying thing it is to see cans of wheat and rice and beans under the beds or in the pantries of women (and men) who have taken welfare responsibility into their own hands. Such food may not be tasty, but it will be nourishing if it has to be used."
President Gordon B. Hinckley (1910-2008)
"In the Arms of His Love," Liahona, November 2006
"In the Arms of His Love," Liahona, November 2006
***words in italics added by me, but I don't think Pres. Hinckley would mind.
Thursday, April 15, 2010
How to: Find Food Storage Recipes
We really think it's important to have food storage recipes that only use food storage items. Of course, there are many great everyday recipes that you can make that will use your food storage, and that's an excellent way to rotate your food. However, in an emergency situation, it may not be an option to just supplement your meals with food storage. You may be living off only your food storage food. And if you don't know any recipes that use only food storage food, you will be really frustrated.
That's why Abbie and I make sure that all the recipes we share on our food storage recipes page use only non-perishable food storage ingredients.
So, how do we come up with all our recipes? One of my favorite go-to methods is to visit AllRecipes.com.


That's why Abbie and I make sure that all the recipes we share on our food storage recipes page use only non-perishable food storage ingredients.
So, how do we come up with all our recipes? One of my favorite go-to methods is to visit AllRecipes.com.

Allrecipes has a really neat feature where you can search by certain ingredients. See that "Ingredients" tab at the top of the Allrecipes page? Click on it and you'll see this below:

The ingredient search! First I always put in the ingredients I don't want to use: butter, eggs, and margarine (since they are not food storage friendly). Of course, I could use powdered eggs or powdered butter but let's say I don't have them on hand, so I don't want any recipes that include those ingredients.

So I type those ingredients in, and I include flour and sugar, since I want to bake something.

Ta-da! You should get a long list of yummy recipes that don't include the ingredients you don't have on hand. If you find a lot of recipes coming up that use an ingredient you don't have, just go back and add it to the list of ingredients you don't want, to narrow your search even more.
I love using this method to find recipes because it gives me a lot of great options that don't use those perishable ingredients. Try searching for wheat recipes, or recipes that use oats. Once you find enough non-perishable recipes that you like, make a food storage plan and then make your master grocery list.
Finally, you can also list the results by title, rating, or relevance. I like to sort by rating, so I can see all the top-rated ones first.
Good luck finding your food storage recipes!! Let us know if you find any great ones!

Wednesday, April 14, 2010
Gardening: Preparing your plot
We'll be reposting some of our gardening series throughout April to help you get ready for gardening season. Please feel free to leave tips on starting and maintaining a garden!
 First thing is to clear away all the leftover debris from the year before. Pull the dead plants and the weeds as much as you can.
 Then till up the dirt. You can do this with a shovel, but it's so much easier and faster to do it with a tiller. You can rent one from a local hardware store, or borrow from a friend that has one. Every year. Thanks guys.
 Work your tiller all through the garden to mix up all the soil. This brings the soil from the bottom to the top, and breaks up leftover roots. All in all, making for a better planting ground.
 Next up is to treat your soil. You can send in a sample of your soil, through your local cooperative extension service, to be tested for any deficiencies: lime, and whatever. Yes, that is the extent of my knowledge.
 You can also buy fortified potting soil and mix it in.
 Or you can walk over to your compost pile and shovel the compost onto the top of your garden. It's the easiest option.
The only thing we put in our compost pile is grass clippings. Every year we turn it over and the grass on the bottom has composed or broken down into a fertilizer. This is, thanks in large part, to a very hardworking colony of roaches. We all have to pull our own weight around here.
 Now till through the garden all again to mix in all that good insect poop. 'Cause really, that's all it is.
 Use your shovel to make raised rows. The seeds will go on the top of the raised rows. This way you will know exactly where the seeds are and won't be in danger of stepping on them.
If you get lots of rain in your area, or your garden is quite big, you can pick up some flat stones to use as stepping stones.
You're ready to plant!
Originally posted April 9, 2009
Tuesday, April 13, 2010
Food Storage Tuesday
Every Tuesday, we post specific items you should gather in order to supplement your emergency car kit, your three-month supply, and your longer term storage. If you are new to our blog, don't worry! You won't be left behind. Just start up where we are and follow along. You will eventually have everything completed. Once the car kit is complete, we'll be putting together 72-hour kits again (week by week). Once those are done, we'll gather the car kits again. So don't worry, just jump on in and join us where we are today!
This week for your car kits, add a book or some scriptures. I don't know about you but I love to have some reading material in my car for times that I am sitting in the car waiting around for something!
How is your three-month supply coming along? Don't forget, you should store foods that you normally eat as a family. That way nothing will go to waste since you will be eating (and rotating) it regularly. Make a food storage plan and buy according to that. Don't have time to create a list of food storage meals? Check out our food storage e-book - we've done it all for you. Or, look at our food storage recipes and come up with your own shopping list.
We are gathering wheat this month for our longer-term storage. Don't know what to do with wheat? Check out our food storage recipes.
Monday, April 12, 2010
Motivational Monday

“I should like to address a few remarks to those who ask, ‘Do I share with my neighbors who have not followed the counsel? And what about the nonmembers who do not have a year’s supply? Do we have to share with them?’ No, we don’t have to share—we get to share! Let us not be concerned about silly thoughts of whether we would share or not. Of course we would share! What would Jesus do? I could not possibly eat food and see my neighbors starving. And if you starve after sharing, ‘greater love hath no man than this …’ (John 15:13.)
Vaughn J. Featherstone, “I Have a Question,” Ensign, Oct. 1976, 31–32
Saturday, April 10, 2010
Our Sponsors
You may have noticed that we've added some sponsors to our blog! We are really excited about it and I just want to take a minute to introduce you to them:


Our other sponsor currently is Our Happy Homestead. Our Happy Homestead is such a neat website - they focus on helping people get "back to basics" and helping families find their homesteading roots. They offer grain mills, smokers, and some neat water storage options (just to name a few things!). Please be sure to check them out, too!
THANKS to our sponsors!
If you are interested in becoming a sponsor for Safely Gathered In, please contact us!
Friday, April 9, 2010
Food Storage Friday: Four-Grain Batter Bread
Brittany here. Question: What do you do when you run out of store-bought bread and you have a food storage post to do at the same time?
Answer: Try out a fast new recipe, of course.
This four-grain batter bread, courtesy of my Betty Crocker cookbook, is a quick and simple answer to a yeast bread when you don't have the time/energy/desire to knead and wait.
 Ingredients: cornmeal, white flour, wheat flour, sugar, salt, baking soda, yeast, milk (reconstituted from powder), water, wheat germ, oats (the recipe called for quick, but I used old-fashioned and didn't have any problem)
 Grease two pans and sprinkle with cornmeal.
In a large bowl, mix 2 c. white flour, 1 1/2 c. whole wheat flour (I used white wheat), 2 T. sugar, 1 t. salt, 1/4 t. baking soda, and 4 1/2 t. yeast. NOTE: The recipe actually called for this entire amount of flour to be white, but since I wanted to use half wheat, I increased the yeast and baking soda amounts a bit to compensate. I'm not sure if that was a good idea or not.
Heat 2 c. milk and 1/2 c. water in microwave/stove until very warm. Add to dry ingredients.
 Beat on low until incorporated and then on medium speed for about 3 minutes. Then, stir in the other three grains of the "four-grain batter": 1/2 c. whole wheat, 1/2 c. wheat germ, 1/2 c. oats, and enough of the original whole wheat flour (I added another cup or so) to make a stiff batter. I think I added a bit too much flour, but it turned out pretty decently.
 Divide batter into pans, mold as needed, and sprinkle with cornmeal. Cover and let rise about 30 minutes or until batter is about 1 inch below top of pans.
. These crowned over, but as you can see, they didn't rise much more in the oven, so my personal opinion is that it's okay to let them rise above the top.
 Bake at 400 for 25 minutes. Remove to rack and cool. Brush with melted butter, if desired. Enjoy!
Four-Grain Batter Bread courtesy of Betty Crocker
cornmeal
2 c. all-purpose flour
2 1/2 c. to 2 3/4 c. white wheat flour
2 T. sugar
1 t. salt
1/ 4 t. baking soda
4 1/2 t. yeast
2 c. milk
1/2 c. water
1/2 c. whole wheat flour
1/2 c. oats
1. Grease two 8 1/2x4 1/2 pans and sprinkle with cornmeal.
2. Mix 2 c. all-purpose flour and 1 1/2 c. wheat flour, sugar, salt, baking soda, yeast in large bowl. Heat milk and water until very warm. Add milk mix to dry ingredients. Beat with mixer on low until incorporated, then beat on medium for about 3 minutes.
3. Stir in remaining 1/2 c. wheat flour, wheat germ, oats, and enough of original whole wheat amount to make a stiff batter. Divide batter between pans and round tops as needed. Sprinkle with cornmeal and cover to rise for about 30 minutes or until batter is about 1 inch below top of pans.
4. Bake at 400 for 25 minutes until light brown in color. Remove to wire rack and let cool.
Answer: Try out a fast new recipe, of course.
This four-grain batter bread, courtesy of my Betty Crocker cookbook, is a quick and simple answer to a yeast bread when you don't have the time/energy/desire to knead and wait.
 Ingredients: cornmeal, white flour, wheat flour, sugar, salt, baking soda, yeast, milk (reconstituted from powder), water, wheat germ, oats (the recipe called for quick, but I used old-fashioned and didn't have any problem)
 Grease two pans and sprinkle with cornmeal.
In a large bowl, mix 2 c. white flour, 1 1/2 c. whole wheat flour (I used white wheat), 2 T. sugar, 1 t. salt, 1/4 t. baking soda, and 4 1/2 t. yeast. NOTE: The recipe actually called for this entire amount of flour to be white, but since I wanted to use half wheat, I increased the yeast and baking soda amounts a bit to compensate. I'm not sure if that was a good idea or not.
Heat 2 c. milk and 1/2 c. water in microwave/stove until very warm. Add to dry ingredients.
 Beat on low until incorporated and then on medium speed for about 3 minutes. Then, stir in the other three grains of the "four-grain batter": 1/2 c. whole wheat, 1/2 c. wheat germ, 1/2 c. oats, and enough of the original whole wheat flour (I added another cup or so) to make a stiff batter. I think I added a bit too much flour, but it turned out pretty decently.
 Divide batter into pans, mold as needed, and sprinkle with cornmeal. Cover and let rise about 30 minutes or until batter is about 1 inch below top of pans.
.
 These crowned over, but as you can see, they didn't rise much more in the oven, so my personal opinion is that it's okay to let them rise above the top.
 Bake at 400 for 25 minutes. Remove to rack and cool. Brush with melted butter, if desired. Enjoy!
Four-Grain Batter Bread courtesy of Betty Crocker
cornmeal
2 c. all-purpose flour
2 1/2 c. to 2 3/4 c. white wheat flour
2 T. sugar
1 t. salt
1/ 4 t. baking soda
4 1/2 t. yeast
2 c. milk
1/2 c. water
1/2 c. whole wheat flour
1/2 c. oats
1. Grease two 8 1/2x4 1/2 pans and sprinkle with cornmeal.
2. Mix 2 c. all-purpose flour and 1 1/2 c. wheat flour, sugar, salt, baking soda, yeast in large bowl. Heat milk and water until very warm. Add milk mix to dry ingredients. Beat with mixer on low until incorporated, then beat on medium for about 3 minutes.
3. Stir in remaining 1/2 c. wheat flour, wheat germ, oats, and enough of original whole wheat amount to make a stiff batter. Divide batter between pans and round tops as needed. Sprinkle with cornmeal and cover to rise for about 30 minutes or until batter is about 1 inch below top of pans.
4. Bake at 400 for 25 minutes until light brown in color. Remove to wire rack and let cool.
Thursday, April 8, 2010
How to: Can (bottle) chicken

Items needed:
-chicken (we used boneless/skinless.. I don't know if this is a requirement. Does someone know?)
-bottles/jars and tops
-salt
-pressure canner


So how long does it take? It depends on how much chicken you are canning, and it depends on where you live! Your pressure canner's manual will give you all the information you need to know, so refer to that.

This is the pressure gauge. You start the timer when the pressure reaches a certain point (again, find out in your manual). I think we had to wait 45 minutes or an hour - something like that.


This was a lot of fun to do, but I'll admit that it was kind of scary, too! It's kind of unnerving to see something so big and with so much pressure inside sitting on your hot stove. And when that pressure gauge starts shaking, it's scary! I didn't want to stand too close. Thankfully, my mother-in-law knew what she was doing so everything was great.
Probably the biggest piece of advice I have is to read your pressure cooker manual. It answered all our questions, and was very clear about all the directions for how to bottle everything you could possibly want to bottle. It was great.
Does anyone else have any bits of advice for bottling food? Any suggestions?
Subscribe to:
Posts (Atom)


