
First of all, Happy Memorial Day! We hope everyone is having a great day full of family, friends, and FOOD! Isn't this a great country we live in? Thanks to all the servicemen and women who have fought for our freedom!
Two years ago, Abbie and I decided that, while food storage is not always fun or exciting, it's necessary. So, we decided to do it together. We'd make ourselves accountable to each other, and keep each other motivated. We eventually came up with the idea of a blog, and hoped that we could help other people along the way, too (plus, we'd have WAY more people to be accountable to! Extra motivation right there).
In honor of TWO YEARS of blogging here at Safely Gathered In, we are hosting a week of giveaways this week. Be sure to come back every day and check out the great stuff that some of our sponsors and other friends have provided. Each day, the giveaways will be opening up at 10 a.m. and will be open for 24 hours. So, if you read our blog through Google reader or something similar, be sure to just come over to our site every day and check out what we've got (we'd hate for you to miss a giveaway deadline because you didn't get the RSS feed in time!).
Thanks to everyone who has been following our blog - whether you are a new reader or whether you have been with us since the beginning. Thank you all. Abbie and I have learned so much over the last two years. If anything, this blog has really helped me understand food storage so much better, and I'm just so happy that we've been able to help some of you too.
See you all tomorrow for the first giveaway of the week!
Monday, May 31, 2010
Tuesday, May 25, 2010
Food Storage Tuesday
Every Tuesday, we post specific items you should gather in order to supplement your emergency car kit, your 3-month supply, and your longer-term storage. If you are new to our blog, don't worry! You won't be left behind. Just start up where we are and follow along. You will eventually have everything completed! Once the car kit is complete, we'll be putting together 72-hour kits again (week by week). Once those are done, we'll gather the car kits again. So don't worry, just jump on in and join us where we are today!
This is the LAST week for our car kits and we'll be done! Next week we'll start gathering items for 72-hour kits, week by week. Woo hoo! I am especially working on my car kit because we will be moving soon... making the long 8 hour drive from GA to the VA coast (ok, it's not that long of a drive, but I really hate driving so I'm dreading it! Especially since my husband will be driving a truck and I'll be driving by myself with the kids).
Ok... anyway. This week for your car kit, add some cash. I recommend anything from $5-$20, whatever you feel comfortable keeping in your car. Be sure to keep a good mix of small bills and coins. You could keep all the money in your car kit, or keep it in your glove compartment or somewhere up front where it's easily accessible. Or you could split it up.
How is your three-month supply coming along? Since I'm eating my food storage right now, I need to get busy and make a food storage plan for when I move to VA. I'm going to decide on 21 of my favorite food storage recipes for dinner, and I'm going to (hopefully) just buy all the ingredients for each meal 4 times when I get to Virginia. That right there gives me 12 weeks of dinners (three months' worth). I'll probably just plan out 7 breakfasts and lunches, and buy them each 12 times.
This month for our longer-term storage, we are gathering oats. Thankfully, my 3-year-old loves oatmeal so I know that we would have no problem eating that if the time came that we had to live off food storage. :) Not sure what to do with oats? Check out our post about oats in food storage. You can also check out our post on how to store food storage. There are a couple different options!
Wednesday, May 19, 2010
Food storage goals update (with a question at the end!)
Hannah's food storage update:
One food storage goal that I set in January was to figure out what to do with my food storage as I prepared to move. Several weeks ago I told you all that I had decided that we would eat through it now, and with the money I am saving at the grocery store (pretty much only buying perishables), I would re-stock my food storage shelves after the move is over.
Well, for an update: my shelves are looking pretty bare, and I'll admit that I love it! Sure, I feel a little bit uneasy not having my closet full of food, but I have a nice bit of cash that is burning a hole in my food-storage-only money envelope... just waiting for a big shopping trip to Sam's Club or Costco once I settle in our new home in Virginia (I'll write a post about my shopping trip when the big day comes!).
And speaking of new homes...... we found ours! My husband and I took a couple of days and went up to Virginia to look for a place to spend the next 12 months. It was actually a really disheartening trip. We found a place that we loved (a three bedroom townhouse), but it was at the very top of our budget and when it came down to it, we just couldn't sign on the dotted line! Has that ever happened to you? I don't know if it was a case of cold feet or what, but in the end we settled on a small 2-bedroom apartment for a couple hundred dollars less per month than the townhome. To be honest, we are not too excited about it but for the most part I feel good about our decision.
So what does this have to do with food storage? Well, I am racking my brain trying to think of where in that small apartment we can store food! I'll definitely be looking right here on our blog at recent posts about where to store food storage, but I'm asking you all now:
Where do you keep your food storage? Do you stash it under your beds? In the back of the closet? Do you like in behind your couch like Abbie does? Is it in the garage or basement? (if you have a basement I am extremely jealous of you. Actually, I am jealous of your garage, too!) Any unorthodox places that I should think about? Let me know!
Friday, May 14, 2010
Food Storage Friday: A brownies experiment
A few weeks ago, at my sister-in-law's wedding reception, I was talking to my husband's grandmother about food storage. She shared with me the strangest food storage recipe I have ever heard (ok, probably not the strangest... there are some pretty weird ones out there!). But I couldn't stop thinking about it and wondering, Could it really work? Would that really taste normal??
And so I decided to try it. It's so easy and quick! Key points when you have two littles ones at your feet and not a lot of time.
The ingredients: 1 box of brownie mix, 1 can of black beans. That's it. See, I told you it was strange!
 Pour the entire can of black beans into your blender. Puree until smooth (I mean, unless you like chunks of beans in your brownies.....)

Next, combine the brownie mix and pureed beans. I'll admit, I hesitated a little bit at this part. Did I really want to (potentially) ruin an entire box of brownies?? When my husband found out what this recipe entailed ("beans in brownies?? sick!!"), he tried to make me promise that I would only make half the recipe. But, I decided against that. Go big or go home, right?

 Clearly I should have used a bigger bowl. Anyway... I am a huge advocate for eating brownie batter (and cookie batter, cake batter... you get the idea). However, I was a bit hesitant to try this bean-infused batter. So what's a mom to do?
 Yes, she liked it! And once I tasted it, I realized it wasn't half bad. Garrett's grandma had said to bake the batter according to the package directions. That would mean 40 minutes for my 8x8 cake pan. However, after 40 minutes it was still pretty gooey in the center, so I just covered it with tin foil and kept baking. It ended up taking about an hour to be completely baked.
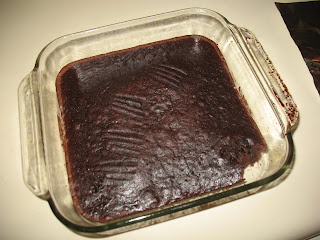 See those fork marks in the finished product? That's me trying to see if it was done. The nibble mark in the corner is also mine. :)
The verdict: We took the brownies to our friends' house and shared them with the people there. Everyone seemed to really like them - they were very moist and heavy. I personally didn't like them very much because since I knew there were beans in them, I could slightly taste them (they were incredible with fresh strawberries on top, btw. Kinda masked the bean flavor). After everyone was done eating I told them what was inside. A few people were like me and decided that they didn't really like them very much after all (because like I said, once you know there are beans inside, you can kind of taste them!). Another friend decided that he liked them MORE since they were "healthy" (note: I am not saying that they are healthy. That's what HE said).
I would love to try making these again, but with white beans since they have a more mild flavor than black beans. I think they would actually be very good. If anyone has tried this, please let me know how they turned out! I think this a great recipe during an emergency situation (i.e., you don't have eggs and/or oil).
Don't have electricity? You can still make this recipe using a cardboard box oven.
Food Storage Brownies
1 can black beans (NOT the spiced variety!)
1 box brownie mix
Puree one can of (undrained) black beans in a blender. Add to your box of brownie mix, and combine. Bake according to package directions.
Don't tell anyone what is in them until AFTER they are done eating. Or, you could just keep it a secret. I won't tell.
Enjoy!
(Apologies to my 3-year-old... someday she will hate me for posting a picture of her still in her pj's, and with her hair undone.) :)
And so I decided to try it. It's so easy and quick! Key points when you have two littles ones at your feet and not a lot of time.
The ingredients: 1 box of brownie mix, 1 can of black beans. That's it. See, I told you it was strange!


Next, combine the brownie mix and pureed beans. I'll admit, I hesitated a little bit at this part. Did I really want to (potentially) ruin an entire box of brownies?? When my husband found out what this recipe entailed ("beans in brownies?? sick!!"), he tried to make me promise that I would only make half the recipe. But, I decided against that. Go big or go home, right?


The verdict: We took the brownies to our friends' house and shared them with the people there. Everyone seemed to really like them - they were very moist and heavy. I personally didn't like them very much because since I knew there were beans in them, I could slightly taste them (they were incredible with fresh strawberries on top, btw. Kinda masked the bean flavor). After everyone was done eating I told them what was inside. A few people were like me and decided that they didn't really like them very much after all (because like I said, once you know there are beans inside, you can kind of taste them!). Another friend decided that he liked them MORE since they were "healthy" (note: I am not saying that they are healthy. That's what HE said).
I would love to try making these again, but with white beans since they have a more mild flavor than black beans. I think they would actually be very good. If anyone has tried this, please let me know how they turned out! I think this a great recipe during an emergency situation (i.e., you don't have eggs and/or oil).
Don't have electricity? You can still make this recipe using a cardboard box oven.
Food Storage Brownies
1 can black beans (NOT the spiced variety!)
1 box brownie mix
Puree one can of (undrained) black beans in a blender. Add to your box of brownie mix, and combine. Bake according to package directions.
Don't tell anyone what is in them until AFTER they are done eating. Or, you could just keep it a secret. I won't tell.
Enjoy!
(Apologies to my 3-year-old... someday she will hate me for posting a picture of her still in her pj's, and with her hair undone.) :)
Monday, May 10, 2010
Inspirational Thought
 No matter how small the home, members find space for food storage. In Carmen Merisalde’s home in Bogotá, the telephone table covered by a lovely floor-length cloth is really a barrel filled with bags of dry-packed food.
Members are encouraged to save a little bit—even just a handful—of rice or other basic foods every time they prepare a meal. That way, even when money is scarce, they are storing little by little. When they have collected enough, they dry pack it for storage. The stake owns a dry-pack machine that rotates from ward to ward so everyone has a chance to use it. “You should see the tears in the eyes of many as they dry pack the first bag of rice they have collected handful by handful,” says President Saavedra.
Sharing with others. Some of the food in Ivonne Palacio’s kitchen cupboards in Bogotá will never appear on her table. It is reserved for others. The Area Presidency encourages members to store food to share in cases of emergency. “We call it ‘the Lord’s storehouse in the homes of the members,’ ” says Elder Costa. “The bishop asks families to always have on hand a certain amount of rice or other basic food items that they can donate. Then when he asks for it for a needy family, they donate it and buy more to replace it.”
This method has several benefits. “First, it encourages members to have their own food storage,” says Elder Costa. “Second, we are taking care of emergencies quickly. Third, we can save fast-offering funds for situations in which cash is needed, such as for medicine or rent. Although the Kénnedy stake is one of the poorest economically, almost all families have some food storage—and many have some to share. And the stake is self-reliant in fast-offering funds.”
“We are not storing just food and water, we’re also storing blessings!” says Sister Palacio. “Heavenly Father is teaching us to have the pure love of Christ.”
Liahona, 2005, March The Saints of Colombia: An Example of Strength
By Marvin K. Gardner
Church Magazines
Saturday, May 8, 2010
Weekend Roundup: Try a Tin Foil Dinner
A couple of weeks ago, our family went camping. I decided to try tin foil dinners for the first time. Mountain Man has had them a lot, but it was my first time.
 I made his and her tin foil dinners. Mine had a fish (tilapia) fillet with chopped veggies (zucchini, sweet potato, and red pepper). I put the fish in raw (scary) and sprinkled everything liberally with salt and pepper. Then I triple wrapped it in tin foil!
 Mountain Man requested a pork chop. I sliced apples to go on top and added brown sugar and butter. He added the hot sauce. :)
 This is after it had cooked in the fire. The veggies and fish had steamed perfectly in the foil. It was SO delicious.
 Perfect camping food!
Served with this salad on the side. Try a tin foil dinner, it's so easy to make them to suit your tastes. Check out Sarah's tutorial here!
Friday, May 7, 2010
Food Storage Friday: Thin Mint Cookies
If you're like me, your girl scout cookies are already all gone.

Here's a food storage recipe for a quick and easy thin mint.
 Ingredients: chocolate chips, ritz crackers (or the generic brand) and peppermint extract
 Although ironically, I didn't have peppermint extract...so I used maple. But I've had them with peppermint and they really do taste like the girl scout cookies.
 To melt your chocolate, set up a double boiler , or put a couple of inches of water in a pot and then set another bowl on top of it, not touching the water.
 Pop the chips in and stir until they melt.
 Keep stirring until the chocolate is smooth. At this point, I still had time to go.
 When the chocolate is melted and smooth, add the extract and remove from heat. Use a fork to dip the crackers and cover them with chocolate.
 When the crackers are dipped place them on wax paper on a tray.
Mine looked less than fancy, but I don't have much experience with candy/melted chocolate etc. But they tasted great regardless of how they looked.
 Stick the tray into the freezer until the cookies harden.
 Enjoy!
Thin Mint Cookies
Recipe from here
chocolate chips
Ritz type crackers
peppermint extract
Melt chocolate with double boiler method. Remove from heat and stir in a few drops of extract. Cover the crackers with chocolate and chill in the freezer.
Tuesday, May 4, 2010
Food Storage Tuesday
Every Tuesday, we post specific items you should gather in order to supplement your emergency car kit, your 3-month supply, and your longer-term storage. If you are new to our blog, don't worry! You won't be left behind. Just start up where we are and follow along. You will eventually have everything completed! Once the car kit is complete, we'll be putting together 72-hour kits again (week by week). Once those are done, we'll gather the car kits again. So don't worry, just jump on in and join us where we are today!
This week for your 72-hour kit, add a pen and paper, and a pocket knife . It doesn't need to be anything fancy - I've linked to one on Amazon for just over $10. Something basic should be just fine... you may even have one around your house that you can add to the kit.
Last week for our 72-hour kits, we added hand sanitizer. In the past, we have gotten questions about exploding bottles of hand sanitizer, so last week I suggested emptying the bottle a bit first. Some of you suggested just storing the hand sanitizer wipes - that's a great idea!
How is your three-month supply coming along? Don't forget to store two weeks worth of water! Read more about water storage right here on our blog. Water is more important than food!!
How is your longer-term storage going? This month we are gathering oats. I love oats- they are so versatile! Check out our food storage recipes to find some recipes using oats.
This week for your 72-hour kit, add a pen and paper, and a pocket knife
Last week for our 72-hour kits, we added hand sanitizer. In the past, we have gotten questions about exploding bottles of hand sanitizer, so last week I suggested emptying the bottle a bit first. Some of you suggested just storing the hand sanitizer wipes - that's a great idea!
How is your three-month supply coming along? Don't forget to store two weeks worth of water! Read more about water storage right here on our blog. Water is more important than food!!
How is your longer-term storage going? This month we are gathering oats. I love oats- they are so versatile! Check out our food storage recipes to find some recipes using oats.
Subscribe to:
Posts (Atom)


