
For baking in an emergency, I plan (for now) to rely on my cardboard box oven. However, solar oven cooking is a great option for baking when there's no electricity. Since neither Abbie nor I have a solar oven, though, we needed to find someone who did and was willing to write a post for us. A big thanks to my sister, Emma, for writing this guest post for us! I think I know what I want for Christmas now!
When I plan my family's food storage, I plan on having no electricity, no running water, etc. so I can be prepared for the worst possible scenario. Then, if we do have those things I'll be pleasantly surprised! So, for Christmas two years ago I asked for this sun oven so I could start practicing cooking in it. It is called the Global Sun Oven and runs around $170. Finally, two years later, this is the first time I've used it and it was a success! My neighbor actually has TWO sun ovens and regularly cooks dinner in them, so thankfully I had someone to give me some pointers for my first time.
I love having a sun oven because you can't burn anything in it. Other perks about having a solar oven: As long as the sun is shining, you have free power. I have a camping stove for the days that aren't sunny. You can pasteurize your water in a solar oven - it only takes 150 degrees to do that, and a good solar oven can get to about 350 degrees. You don't have to stir anything once you've placed your food in the oven, since nothing will burn. For preheating, it only takes 20 minutes to reach 300 degrees F- not bad, right? Since it sounded so easy, I decided I would try to bake a loaf of bread. This is a food storage friendly recipe, adapted from "Everything Under the Sun", a food storage guide with lots of sun oven recipes.
This sun oven comes with a great thermometer for easy temperature checks. You can see in the reflection that it was a partially cloudy day, so my sun oven never reached 350 degrees. So I just cooked my bread longer at around 275 degrees, since that's the highest I could get it.


When the sides are open, there should be no shadows inside for maximum heat.
 The line-up: flour, sugar, water, salt, shortening, yeast
 Combine yeast and warm water. I just used warm tap water, but if I was in an emergency, I would warm it quickly on my camp stove. Set aside.
 Add together all dry ingredients.
Combine dry ingredients... obviously I would be doing this by hand if I had no power!

Melt the shortening before adding it in. I melted it in my microwave, but again, in an emergency I would use my camp stove.
 Add water/yeast mixture and melted shortening to combined dry ingredients.
 Knead until elastic and smooth. This took about 6 minutes for my KitchenAid.
 Just a tip: your dough should stretch, not rip apart when you pull at it.

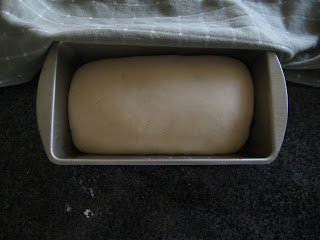
Place in a pan and let it rise until double.
 Add water/yeast mixture and melted shortening to combined dry ingredients.Knead until elastic and smooth. This took about 6 minutes for my KitchenAid.Just a tip: your dough should stretch, not rip apart when you pull at it.
Place in a pan and let it rise until double.
*Note: do not use a pan like the one I used. It will work, but it works much better in lightweight, dark or black pans. You can use glass too. This type of shiny pan will reflect heat, so it takes longer.

 I can't believe I didn't get a picture of the bread actually in the sun oven, but here is the finished product. I cooked the bread for about an hour and a half. Normally it takes about 45 minutes, but with a cloudy day and my shiny pan, it took twice as long.

But the finished product was worth it! The bread was moist, perfectly cooked, and delicious. Best of all, it was easy and food storage friendly.

Doubled in size...ready to cook!
I can't believe I didn't get a picture of the bread actually in the sun oven, but here is the finished product. I cooked the bread for about an hour and a half. Normally it takes about 45 minutes, but with a cloudy day and my shiny pan, it took twice as long.But the finished product was worth it! The bread was moist, perfectly cooked, and delicious. Best of all, it was easy and food storage friendly.
Bread (makes 1 loaf)
from "Everything Under the Sun"
3 cups of all purpose flour (you could also use two cups of white wheat, ground into 3 cups worth of flour)
1 cup warm water
1.5 teaspoons salt
2 Tablespoons melted shortening (OR 2 Tablespoons applesauce)
1/4 cup sugar (OR 1/4 cup honey)
2 teaspoons yeast
Add yeast to warm water, set aside. Mix flour, salt, and sugar. Add yeast and melted shortening, and knead until smooth and elastic. Shape into a loaf and place in greased pan. Cover and let raise until double. Bake in solar oven about 45 minutes or until browned. In a regular oven, bake at 350 degrees F 25-30 minutes.


6 comments:
I am so glad to see this post! I live in SE AZ and have an abundance of sun . . . too much of the time and wanted to start playing with this as soon as all the gardens are in. LOL at your forgetting to take a picture of the bread in the oven. I do that all the time when doing posts and have to it all over again if it was a critical pic. thx again for sharing!
Looks fabulous! We'll have to try that someitme.
Cooking with solar oven is quite interesting.I hope more and more people will use solar ovens.
I agree, solar panels. Glad to see the more folks are utilizing solar panels in their cooking -- if we can harness the power of the sun, why not? My solar oven is my favorite new toy, love it! http://tinyurl.com/cckxmb
I tried this recipe in my regular oven today - absolutely delicious! I love the fact that you can use applesauce instead of oil. I did, however, have to add about an extra 1/2 cup of flour while it was kneading with the dough hook, maybe it was just me, but it seemed too sticky. Came out perfectly, and was soo easy! Thank you so much. And I love the info about the solar ovens.
Love that sun oven!!
Post a Comment