
Every other Thursday we will post about different basic cooking skills. Knowing how to prepare meals from scratch is a very important step in becoming self-reliant, which in turn is a crucial component of being prepared. Being able to cook meals for your family will give you confidence, more family togetherness time, and lower your food budget=more money for food storage! If you have a basic cooking skill you'd like to learn, email us! These meals contain perishable food items as this is a different series than our food storage recipes.
 When you are cutting your budget and trying to save money, the first thing you miss is going out to eat: getting take out, ordering a pizza and so on.
You can make delicious restaurant foods at home for a fraction of the cost. It's true, I promise. You can sit at home and eat burgers, fries and pizza and still save your money. And gosh darn it if it isn't delicious to boot.
 There are hundreds of pizza dough recipes out there, and most of them are delicious. The one I'm going to share today is from MoneySavingMom (here). The reason why I picked this one is because it's a delicious yeasty dough that doesn't require rising. So, you could decide at 4:30 that you wanted pizza for dinner and have it on the table no later than 5:15. That's my kind of cooking.
Ingredients for the dough: flour, yeast, salt, sugar, oil, and water
 To warm water, add the yeast
 sugar and salt
 and mix it up. I like to let it sit here for five minutes, just so the yeast can eat up the sugar. It's not necessary though.
 Take the five minutes to spray your pans with cooking spray or wipe down with oil.
 And sprinkle with cornmeal, just so it doesn't stick.
 See how bubbly it is after five minutes? This is how you know your yeast is working.
 Add the oil
 and the flour
 And stir with your hands or a wooden spoon for about five minutes, just until it comes together into a combined ball. You can definitely make this in a mixer and just turn on the mixer for 3-4 minutes and call it good.
  Preheat your oven. Crank it ALL the way up. Smitten Kitchen recommends cooking pizza at your oven's top temperature, her basic pizza dough recipe is quite delicious too (found here).
 I doubled the recipe today so I could make two nice thick-crusted pizzas. When I don't double the recipe, I still make two pizzas, they are just thin-crusted, which is what Mountain Man prefers.
 You can use a rolling pin to roll the dough out, OR just flatten the dough directly onto your pan, using your hands and fingertips to press it out to the diameter you want.
 Pizza can be as simple or complex as you want. For my kids all I do is a cheese pizza: can of tomato sauce, mozzarella cheese (although they like cheddar as well).
 Grate your cheese, you will only need 2/3 of a 1 lb block of cheese for both pizzas.
 Spoon some tomato sauce onto the unbaked crusts. I like to buy tomato sauce because I can use it for both pizza and spaghetti sauce. You won't use all the tomato sauce for the pizzas, so transfer the leftover sauce to a tupperware to store in the fridge. Never store open tin cans in the fridge.
 You can spice up the sauce by adding some spices or red pepper flakes etc. Or you can leave it plain. If I remember I spice it up, if I forget, it goes un-spiced.
 Spread out that cheese.
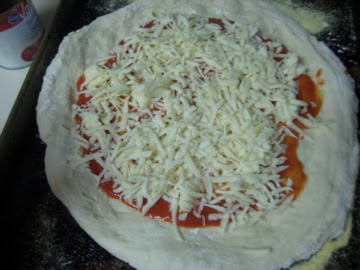 You don't need a lot of cheese. The cheese is definitely the most expensive ingredient in pizza making, so don't over do it. Cheese melts (amazingly huh?) and when it melts it spreads covering more surface area than it does when it's a solid.
 Bake in your super hot oven for 10 minutes or until the cheese is blistered and delicious. If I bake two pizzas at the same time, I switch the racks halfway through baking time so one doesn't get more brown than the other.
 Let the pizza sit for a few minutes after you pull it from the oven. It will be easier to cut and the cheese will stay on better.
 Don't settle for cheese and pepperoni, make yourself a veggie pizza, margherita, meat lovers, whatever you want! And if you like thin-crust pizza, just make the original recipe below and split it into two pizzas. The nice thing about making your own is that you can make it however you want and not worry about your wallet.
Pizza Crust
adapted from moneysavingmom.com
1 Tbsp. active dry yeast
1 cup warm water (105 to 115 degrees F.)
1 tsp. sugar
1 tsp. salt
2 Tbsp. vegetable oil
2 1/2 cups flour
Mix warm water, yeast, sugar and salt in a bowl and let sit for five minutes. When bubbly, mix in oil and flour. Knead or mix until you have a smooth dough. Roll out into two thin-crust pizzas onto your baking sheets. Top with sauce and toppings and bake at your oven's highest temperature for 10 minutes or until the cheese is melted and blistering.


