Monday, June 30, 2008

It's a Giveaway!!!


***Update: CONTEST CLOSED - THANKS FOR PARTICIPATING!
Tomorrow in our "Tuesday post" we're going to assign everyone to add a first aid kit to their car kit, and we are especially excited about this week, because one of our readers will WIN a FREE first aid kit just by commenting on this post!!


It's a 116-piece First Aid Essentials kit, and it's just the perfect size for your car kit. Whoever wins, we'll ask them to email us their address and we'll send it to you! All you have to do is answer one easy question:


What is your favorite thing about our blog so far, OR, what would you like to see more of? Is there something you are just dying to learn? Is there a specific "how-to" that you want to see here? More recipes? More posts? Less posts? Tell us!


This contest is open until TOMORROW night at 10 pm EDT. Then, on Wednesday we'll use Random.org to determine a winner. Tell your friends!! Anyone can participate, whether you are a brand new visitor to our blog or if you've been reading all month. We are so excited to hear your feedback!

Saturday, June 28, 2008

Safely Gathered In: Weekly Roundup 6/23-6/28

A little Food Storage humor before we get going.

A friend of mine has recently felt the fire to get food storage going. She and her teenage daughter went to a local cannery and canned lots of food to bring home. On the way home, the daughter asked where they were going to store all this food. My friend replied, "Under the beds." The daughter was affronted, "Not under my bed!" Later she was complaining to a friend, a teenage boy, and the boy responded: "It's okay, I've got food storage under my bed too."

The Deseret News had an article about freezer bag cooking, in camping or for 72 hour kits. The recipes posted were all food storage friendly. Check out the source of the recipes at the website: Freezer Bag Cooking. What a great resource for meal planning since the ingredients are all non-perishable!

This week while I was surfing the web I realized (gasp) we're not the first ones to do this! So check out these other blogs for Food Storage ideas:

Food Storage Fridays and tips:

http://candhmiller.blogspot.com

http://lauritzenfoodstorage.blogspot.com


and food storage and emergency preparedness websites:

http://www.foodstorageideas.com/

http://www.72hours.org/


If anyone knows any more, please tell us. The more information and tips we have, the easier it will be for all of us to store our food!

Friday, June 27, 2008

Food Storage Friday: Cool Couscous with Fruit and Nuts

I'm going out on a limb on today's recipe because I'm including orange juice from concentrate as one of the ingredients.

Hannah and I have different opinions of what the three-month supply of food should be. I think that you should prepare for the worst: no electricity meaning your freezer/fridge wouldn't be working. Hannah disagrees and thinks that the three month supply would likely be used in a situation where you would have electricity for at least part of the time. So this recipe is for you Hannah.

Although you could store juice in your three-month supply, the kind that doesn't require refrigeration until opening. And really, for this recipe, I bet you could substitute the juice for water, although you might loose a little flavor.


Ingredients: couscous, salt, water, orange juice, oil, dried mixed fruit, and cashews


Couscous is a type of pasta made from wheat, with very small granules. It is a favorite of mine because it can cook in less than five minutes.


Add boiling water to the couscous and salt.


And cover for 8 minutes.


During this time, mix up your oil and orange juice to have ready.


When the time is up, add the orange juice mixture and stir it all together. Cover again, and move to the fridge for 30 minutes to chill. This is a cold dish.


While it's in the fridge, put a loose chop on the cashews, and measure out your dried fruit.


When the 30 minutes are up, add the fruit and nuts and stir. You're done!


Serve! Sorry about the shadowy picture. I had company and I didn't want them to see that I was taking pictures of the food before I served it to them. 'Cause that's weird.

The first time I made this I was expecting a so-so dish, but tried it because it looked so food storage friendly. I was surprised, it was delicious! I ended up making it several times that week and now it's a regular staple at our house.


Cool Couscous with Fruit and Nuts
adapted from Cooking Light

1 cup uncooked couscous
3/4 tsp salt
1-1/2 cups boiling water
1/4 cup orange juice
1 Tbsp vegetable oil
1/2 cup dried mixed fruit
2 Tbsp dry-roasted cashews, chopped

Combine couscous and salt in a medium bowl; add 1-1/2 cups boiling water. Cover and let stand 8 minutes or until liquid is absorbed. Combine juice and oil; stir into couscous. Cover and chill 30 minutes. Stir in fruit and cashews. Yield: 6 servings (1/2 cup each) as a side dish.

Wednesday, June 25, 2008

How To: Plan Your Three-Month Supply

I could talk all day about the importance of having a food storage: temporary job loss, natural disaster, flu pandemic, but the point is, it's SMART to have food set aside, but it's also daunting. Hopefully you won't feel quite so overwhelmed after we explore this method of organizing and collecting food storage.


Keep in mind that this is just one way out of many possibilities, and this is an example, not a plan to copy. Although I don't mind if you borrow some of the meal ideas.


First thing to do is see how much food you are going to need. In the case of the 3-month supply, what does 3 months entail?


Breaking down three months (in red) equals 13 weeks of food or 91 dinners, 91 lunches, and 91 breakfasts. (This is an approximation based on 1 month being 31 days and the other 2 months being 30 days, but break it down however you like). (Yes, I added wrong on my paper--but this is just a sample so don't worry about it!)


Now in yellow I have assigned each week to a menu ('A' or 'B'). So, when I say "menu", I'm talking about 7 days of food. I will repeat these menus over and over because I am not willing to stock and plan 91 different dinner meals! My family can live on repeats for three months, especially if the alternative is no food at all. If you feel like you could eat the same thing each week, then plan one week's worth of meals. I don't think I could eat the same thing every week, so I'm planning two weeks of menus that I will rotate. If that still sounds too repetitive for you then plan three weeks of menus, or even four. It's up to you and your family, and what you can store.


So for my menu there will be 7 weeks (49 dinners) on the 'A' menu week and 6 weeks (42 dinners) on the 'B' menu week (dinners only).


Next we need to plan our menus. Use the food guideline recommendations to make sure that the meals are balanced and healthy. Please plan for your own family's needs and likes. This is simply an example. Keep in mind that you may have electricity during this time or you may not. I'm choosing to plan for the worst case scenario and only choose meals around nonperishable items. Chances are you could have electricity...but it's not a risk I'm willing to take, plus these foods will store for longer!


Notice how many times I will be eating these meals (in red). It's important to figure this out so you can estimate how much food you will need to store. Especially for those bulk items that don't come in individual serving sizes.


Then write down what goes into each meal, all the ingredients. Don't forget spices and oil and things like that, there's no need for your food storage meals to be bland.


Now add up what you would need for all the meals. Since I'm having spaghetti 7 times, I will need: 7 jars of spaghetti sauce, 7-1 lb boxes of spaghetti noodles and 14 cans of vegetables (2 cans/night for our family of 4). This is the most difficult part of the process: deciding how much we eat of everything. Keep in mind that it is better to overestimate than to underestimate.


Finally, add everything up (in yellow) and make a master shopping list. List how many jars of spaghetti sauce you need, how many cans of fruit. Once you have this completed, check it with your food storage inventory you already have to see if you can reduce the amount of food on your master list.


Now you have a list of things you need. Obviously you will not go to the store and buy 94 cans of fruit at once, but you can buy little by little. Take advantage of the sales, and keep track of what you buy AND what you eat. It might be helpful to have an excel spreadsheet or a chart to help you keep track of what you are buying/storing and what you are using (we are going to start talking more about how to rotate food in a few weeks).


Please note: this is not a complete list! This will not feed your family for three months! This is just a sample!


I hope this walk-through has helped you become a little more confident about gathering a 3-month supply. It REALLY is doable if you plan and work on it little by little.

Tuesday, June 24, 2008

One month down! (Week #4)

Well, we are one month into our project and I hope that everyone's up to speed. If it's your first time visiting our site, don't feel left out! Just join in where we are now, and you'll catch up. We're doing everything in cycles, so eventually we'll come around to the beginning again and start all over with the longterm projects, so you can get everything done!

This week on the car kit, add some wet wipes and a roll of toilet paper to your box. I love wet wipes - they're perfect for sticky fingers, and you would be amazed at how they work on stains! I use wet wipes all over my house. The toilet paper may also come in handy, you just never know! The best way to store it is to take it off the roll (wind it around your hand as you take it off) and put it in a ziplock plastic bag. That way, the roll won't get smashed or dirty. Additionally, you can easily separate one roll into 2 baggies, and put them in both your kits if you have 2 cars.

Now, about the 3-month supply. Last week I mentioned one method of how to plan a 3-month supply, and tomorrow Abs is going to post about that concept and she goes into much more depth. Make sure you read it! She has some great charts and things that she wrote up herself, because we wanted to make it as easy to understand as possible.

In the meantime, think about the kinds of things your family likes to eat. Tomorrow's post talks about making menus for your 3-month supply in advance, like I mentioned last week. Take a few minutes today or tomorrow to jot down a few menu ideas and foods that you want to stock up on. Abs and I always mention spaghetti because it's an easy meal to fall back on and it's great for storage, but there is so much more you can have in your pantry! That's why we love doing our Food Storage Friday posts - to give you some great ideas of things you can eat. If you ever had to eat through your food storage, for whatever reason, you want to enjoy it!

Growing up I always imagined that relying on food storage meant eating bland meals of rice or whole wheat grains. Thankfully, I've realized that that just isn't the case, and after reading tomorrow's how-to post, you will hopefully learn the same thing. See you tomorrow!

Monday, June 23, 2008

Motivational Monday


Preparedness, when properly pursued, is a way of life, not a sudden, spectacular program.
We could refer to all the components of personal and family preparedness, not in relation to holocaust or disaster, but in cultivating a life-style that is on a day-to-day basis its own reward. Let’s do these things because they are right, because they are satisfying, and because we are obedient to the counsels of the Lord. In this spirit we will be prepared for most eventualities, and the Lord will prosper and comfort us. It is true that difficult times will come—for the Lord has foretold them—and, yes, stakes of Zion are “for a defense, and for a refuge from the storm.” (D&C 115:6.) But if we live wisely and providently, we will be as safe as in the palm of His hand.

“Chapter 11: Provident Living: Applying Principles of Self-Reliance and Preparedness,” Teachings of Presidents of the Church: Spencer W. Kimball, (2006),114–23

Saturday, June 21, 2008

Safely Gathered In Weekly Roundup: Powdered milk and frugal tips

Powdered milk is a good food storage item for those who have children and/or like cereal and milk. The Happy Housewife has a good post on how she uses powdered milk on a daily basis. There are some great ideas for rotating powdered milk when the expiration date is looming.

This week's Weekly Roundup by The Simple Dollar has a couple of links to some great articles on being frugal. Be sure to check out the frugal tips!

Another great post from The Simple Dollar talks about preparing food at home for less.

Friday, June 20, 2008

Food Storage Friday -Dinner without Electricity: Jerky Curry


Every month we will showcase a meal that you can make without electricity. Today's meal is "Jerky Curry."


We will use a camp stove to make our dinner. Camp stoves come in all different shapes and sizes, this particular one is for backpacking and so it is very small, but really any camp stove will work. You can also make this meal on a regular stove, but if you didn't have electricity here's how to make it.

Just a note: If you are using your camp stove inside, make sure to cook by an open window and not directly on a wood surface, we are using a pizza stone.


The ingredients: Rice, oil, water, powdered milk, curry powder, Beef Jerky, craisins, and cashews.


First thing to do is turn on your stove, add a little oil to the bottom and water, just as if you were making rice on a stove.


Add your rice...


...and take this time to chop up the jerky into eatable pieces. Really there is a quite a bit of leeway with this meal: you can use any canned meat to substitute for the jerky, and dried apples would be great instead of the craisins, or in addition to the craisins!


Add the jerky and the craisins right away, this will soften them up. If you use canned meat, before you start the rice, fry your meat up in a little oil for some flavor and set it aside.

Go ahead and season the rice mixture with a little salt and pepper. Or a beef bouillon cube would be good for some extra flavor.


Now let your rice bubble away. What you are looking for is the water to boil off until it is about level with the rice/jerky mixture.


Get the powdered milk and curry ready.


And when the water boils off, add it and turn off the heat.


Stir it all together...


...and add a little water if it seems dry.


Now cover your pot, keeping it over the turned off burner, and let it sit for about ten minutes. If using canned meat, add it now.


Sprinkle cashews over the top and enjoy. This feeds about four adults...in our case, 2 adults and 2 children with leftovers to spare.


Jerky Curry

1 Tbsp oil
3 cups water
1-1/2 cups rice
1/2 cup chopped jerky
1/4 cup craisins
1/4 cup powdered milk
2 Tbsp curry powder
cashews

Boil water, rice and oil, jerky and craisins in a pot until liquid has boiled level with rice. Turn off heat, add powdered milk and curry powder and mix. Cover and let sit for ten minutes. Top with cashews and eat!

Thursday, June 19, 2008

Want to join our email list?

If you would like to be emailed whenever this blog is updated, email us at:

safelygatheredin @ gmail.com (remove spaces)

Every time we update, we'll email you a direct link to that day's post.

Wednesday, June 18, 2008

How To: Make Croutons


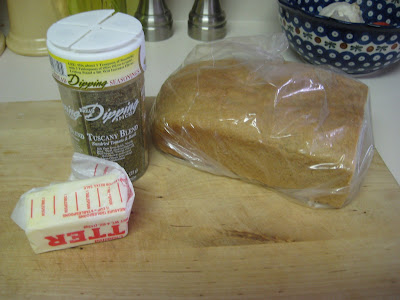
Homemade croutons are a great way to use up stale bread! I've made croutons from both homemade and store bought bread. This particular loaf was lost in the freezer for a while and came out with serious freezer burn.

This is a basic crouton making recipe. There are many versions/varieties in cookbooks and on the web. Feel free to mix it up with different spices.


Ingredients: Stale bread, butter and seasonings.


Preheat the oven and put butter in a baking dish. Then put the baking dish in the oven to melt the butter.


Slice your bread up into crouton-like squares.


When the butter melts pull the pan out of the oven and dump the bread in.


The seasonings. So, you can use ANYTHING: Garlic salt, Parmesan cheese, parsley, pretty much any combination of anything. I'm cheating and using a pre-blended mix.


Put your seasonings on your croutons, as liberally as you want.


Toss it all together, making sure the butter is covering at least most of the bread. This is what keeps your seasonings on your croutons.


If it looks like you'll need more butter, go ahead, add some more.

Now here comes the tricky part. Most recipes tell you to cook your croutons at 300 or 325 degrees, stirring every 5-10 minutes or so until browned. But that takes way too long for me. So I cook mine at 400. But you have to be very watchful to make sure they don't burn!


Oops. If yours gets a little toasty and you're picky, just toss the burned ones. Or eat them. Yum.
Whatever temperature you cook the croutons at, make sure you stir them every once in a while so all the croutons brown evenly.


So you didn't waste your bread and now you have a reason to eat salad tonight! It's a win-win!


Tuesday, June 17, 2008

Another Tuesday (week #3)

First let's talk about our ongoing emergency preparedness project: the car kits. So far, we've gathered water and high-energy snacks. I generally have 3 people in my car, so I put 6 water bottles in my trunk (my kit box is too small to hold the water). I also threw in a 10-pack of granola bars, but as the weeks go on I probably won't have room for all of them, so eventually I'll probably take them out of the box and keep 5 or 6 in there.

This week, add a flashlight and some batteries for the flashlight. Long-term, it's best to store batteries outside the flashlight, so keep them separate. Or, if you want, invest in one of those wind-up flashlights. You can find them for under $15 (online or in stores), which may be a little pricey for your budget, but long-term it will probably save you money since there aren't any batteries to buy or replace later. Get whatever is best for you - anything will do.

Now for the three-month supply. As I was looking through my food storage two weeks ago, I was pleasantly surprised to find that I have a lot more food than I thought! Lately I've been stocking up on groceries that have been on sale, so that's helped a lot. However, as I looked closely, I realized that while it was all good food, it would still be difficult to make even a week's worth of balanced meals. It's great that I have 20 cans of vegetables, but just having those for dinner won't leave us feeling very satisfied. Are you feeling the same way? If you are, here's a possible solution:

Sit down and write up 7 dinner menus for meals that can be made using food storage (if you are having trouble coming up with some, check out our "Food Storage Friday" posts, where every week we share menus using only food storage. There are only a few so far, but check back every Friday for our new one!). Now that you have 7 meals actually planned, you know exactly what to buy each week to add to your food storage. For example, I chose spaghetti and a side of canned veggies and some canned fruit for one meal. This week, I will buy all or part of the ingredients for this meal (depending on prices).
Now, here's a tip that could make this whole thing a LOT easier. I really love the 7 meals that I have come up with. I could eat spaghetti every Monday night if I needed to. Three months is about 12 weeks, so... I am going to stock up on 12 spaghetti dinners! That way, if I needed to live off my food storage, my family would eat spaghetti every Monday night. Does that make sense? The same goes for my Tuesday menu, etc.

If that's all a bit too repetitive for you, plan 14 dinners. That way, if you were living off your three-month supply, you'd have the same dinner once every 2 weeks. Or, just plan to make small tweaks. For our spaghetti dinners, maybe I'll store 6 tomato sauces and 6 Alfredo sauces, just to change things up a bit.

Now that I have my 7 dinners planned, I'm going to make one big organized list of all the ingredients I need for these meals (7 meal ideas x 12 weeks = 84 dinners). That's a lot of food! Every time I go to the grocery store I'll glance over this list, and I'll be ready to stock up if the right things are on sale. Then I'll just cross things off the list as I buy them. When everything is bought, I'll start stocking up on breakfasts and lunches.

It's really important for me to keep organized when it comes to food storage. If I didn't do something like this, and for some reason we had to start living off what we have stored, I'm afraid we'd be eating canned veggies and granola bars. If you are anything like me, I hope this little tutorial will help you get on the right path, too! Good luck!

Monday, June 16, 2008

A "Family Home Evening" Activity - Emergency Preparedness

It's important to teach your kids about the possibility of an emergency. You don't want to scare them, obviously, but the more prepared they are, the safer they will be in the event that something happens.

Once a month, we are going to share with you an activity that will help you teach your families about the importance of food storage, or that will help prepare your family in the event of an emergency. This month's activity is about emergency preparedness, and it's a lot of fun.

First, though, I want you to imagine something for just a moment. Imagine that you are away on vacation, and while you are gone you see on TV that a tornado has hit your city. Later, you find out that your home is completely ruined. Sad, I know! Hopefully you have homeowners insurance! So, you call your insurance company and explain everything. They say that they need proof of your possessions before they replace them.

Ok, now comes the hard part. What did you even have in your home, and where can you find proof of that? It's going to be easy to list some everyday items, and the big things in your house are hard to forget about. But it's virtually impossible to remember everything you have in your home. You won't get everything back, that's a fact. Hopefully after this activity, though, you'll do a lot better than you would have otherwise.

All you need is:
  • a camcorder (if you don't have one, borrow one!)
  • a blank tape for the camcorder

It's simple - for your family activity, go through your house and videotape your possessions! Go from room to room and describe what you see. Your kids will love showing off their toys for the camera. You could even let the kids take turns being the videographer, if they're old enough.

My husband and I did this in our first home we lived in, just a couple months after we were married. Thankfully, we never had to use the tape for insurance purposes, but it's fun now to look back at where we lived and the things we had when we were first starting out (ok... most of it's still the same, but it will be REALLY fun to look back in 15-20 years!).

One last thought, and this is important.... DON'T store the only copy of this tape in your home! If something happens and your home is ruined, chances are the tape is gone, too. Make a copy of it and send it to a relative or friend who lives far enough away that whatever happened to your house (tornado, flood, earthquake, whatever) most likely didn't happen to theirs, too. Make sense?

Enjoy this activity! Get everyone in the family involved and have a good time. The prophet told us to be prepared, and by golly, we're gonna do it!

Saturday, June 14, 2008

Weekend Roundup - 6/9 through 6/13

Every Saturday we share some of our favorite articles from the previous week.

Make frugality a habit!

Karen at MSN money blog tells us how to teach your kids about money.

If you don't like having a set menu, try this idea: having 31 staple items that make 31 meals. This would be a great way to organize a 3-month supply and keep it from getting overwhelming.

Are coupons worth your time? The Simple Dollar talks about it in this post.


And finally, a flashback budget: how did they manage money back then?

Friday, June 13, 2008

Food Storage Friday: Granola Bars

These chewy granola bars are delicious and made with only nonperishables. This is the basic recipe, feel free to add in anything you like.


The ingredients: Oats, Rice cereal, peanut butter, corn syrup, vanilla and brown sugar.


Start by putting the brown sugar and corn syrup on the stove to boil.


While you're waiting, mix the oats and cereal...


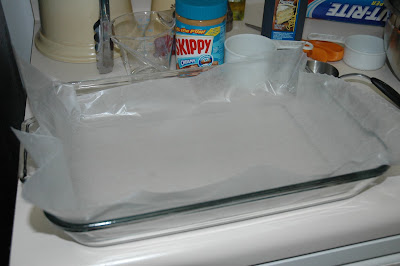
...and line a 9x13 pan with wax paper.


When your mixture boils, remove from heat...


...and add peanut butter and vanilla, stirring until combined.


Add to the cereal and oats...


...stir until the oats and cereal are covered by the peanut butter mixture. If you are adding any extras, wait a few minutes until it's not so hot to stir them in.


Dump the mixture into the pan and spread out evenly with your fingers.


Wait 15-20 minutes, and then slice with a pizza cutter.


These are hard to resist, they are so good!

Camille's Granola Bars


1/2 cup brown sugar
1/2 cup corn syrup
1/2 cup peanut butter
1 tsp. vanilla
2 cups oats
2 1/2 cups rice krispie cereal
optional: chocolate chips, almonds, raisins, etc.

Start by putting the brown sugar and corn syrup on the stove to boil. While you're waiting, mix the oats and cereal together in a bowl and line a 9x13 pan with wax paper. When your mixture boils, remove from heat and add peanut butter and vanilla, stirring until combined. Add to the cereal and oats and stir until the oats and cereal are covered by the peanut butter mixture. If you are adding any extras, wait a few minutes until it's not so hot to stir them in. Dump the mixture into the pan and spread out evenly with your fingers. Wait 15-20 minutes, and then slice with a pizza cutter.